Big Slide Lake

So this past weekend Steve, the pups and I went on our first backpacking trip of the season. We usually get started with our backpacking season earlier in the year, but this spring we went on a trip to Nicaragua and then we had the moms in town. Needless to say we were pretty pumped to be taking the weekend off to head up to the Bull of the Woods Wilderness. I think this is only the second hike I have ever done in Bull of the Woods, so it was nice to explore it a bit more. We took the Dickey Creek trail all the way up to Big Slide Lake where we camped for the night. Quick Stats Distance: 12 miles Time: 4 hours each way Difficulty: difficult, pretty steep in parts with loose rock, many logs to climb over, and a fun creek crossing Permit: Yes, NW Wilderness Pass, get it ahead of time because there isn’t … Continue reading

A Weekend In Bend

So you’re planning a trip to Bend, huh? Maybe you’re coming for the killer mountain biking,  the brewery scene, or maybe just to get some more Vitamin D in your life. Steve and I have been living in Bend for … Continue reading

McKenzie River Trail & Clear Lake

The McKenzie River Trail is a super popular trail in the Cascade Range. It’s one that I’ve always skipped because I love alpine hiking. After a recommendation from one of my coworkers I figured it was about time to give … Continue reading

Finding the Beauty…

If you follow my blog regularly you’d think that I’m always going on perfect hikes with perfect weather and going on amazing trips with perfectly planned itineraries, but that is not the case. Often times we will head out for … Continue reading

Deschutes River Trail: Lava Island Falls to Aspen

Quick Stats Distance: approx. 4 miles Time: 2 hours (at a leisurely pace) Difficulty: Easy Dog Friendly: Yes, Off-leash in the wintertime Permits: Yes, Northwest Forest Pass Pros: Beautiful, easy trail minutes from town, option to make hike as easy … Continue reading

Vista Butte Snowshoe

This winter season hasn’t necessarily been the best for outdoor pursuits, but Steve and I have managed to go snowshoeing at Vista Butte Sno-Park twice this season. It’s literally a twenty minute drive, at most, from our house, it’s relatively … Continue reading

Tumalo Falls to Happy Valley

Quick Stats Distance: 8 miles roundtrip (can also make a loop out of it if you want) Time: 3 1/2-4 hours Difficulty: Easy to moderate Season: June to October Permit: Northwest Forest Pass Dog Friendly: Yes. Off-leash fun for most … Continue reading

White River Snowshoe

white river west sno-park mt hood

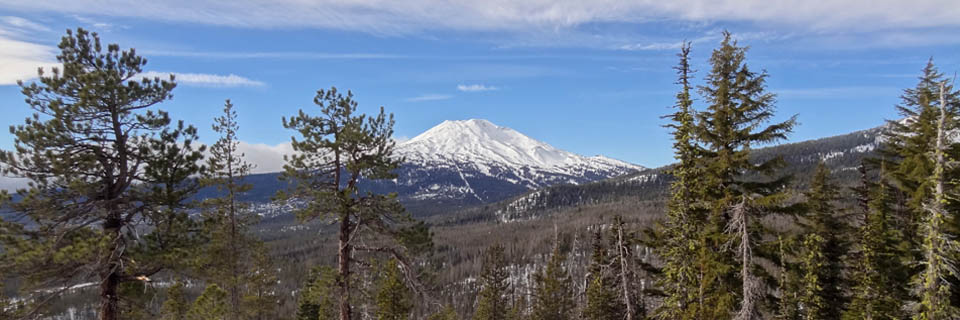
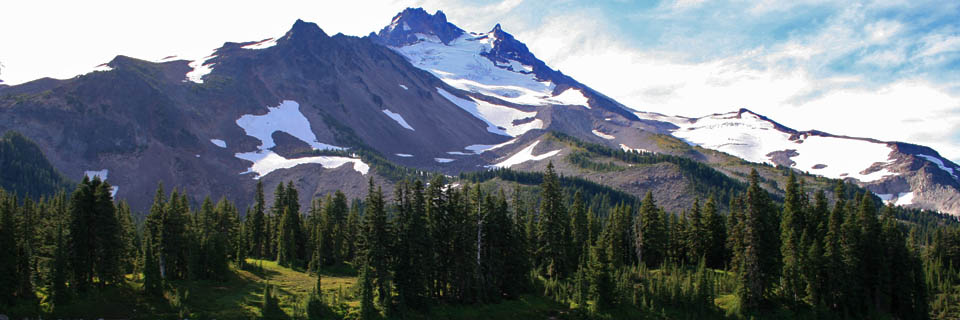
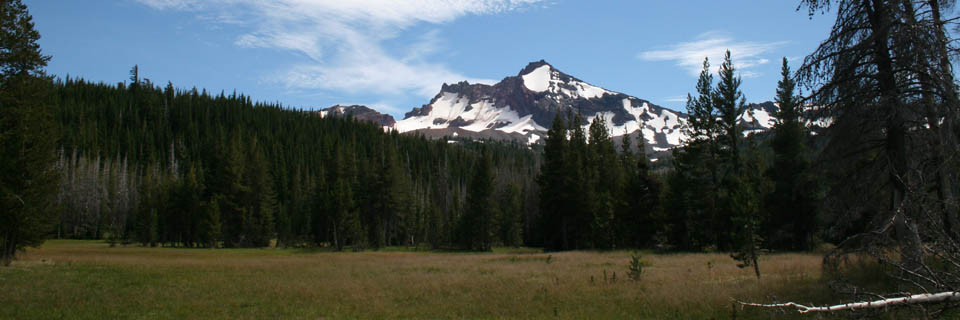
Mt. Hood from the White River West Sno-Park

Instead of baking all Christmas Eve day, Steve, our friend Angie and I decided to head up to the mountain for some winter fun and I was only minimally harassed when I showed up to Christmas Eve dinner without pumpkin cheesecake. We were on a bit of a time crunch, so we decided on the White River trail because of it’s accessibility, shortness of the hike, and killer views of Mt. Hood. Apparently everyone else had the same idea because the Sno-Park was packed with families and their furry friends sledding, snowshoeing and cross country skiing. There was also a mountain rescue going on the same day because three people had gotten lost while snowshoeing to a cabin two days prior. The group was thankfully found before the day was over.

Quick Stats

Distance: 3 miles roundtrip to the power lines; longer options abound (we hiked about a 1/2 mile passed the power lines and had a beautiful view of Mt. Hood and the Meadows chair lift)

Time: 2 hours

Difficulty: Easy-moderate to the power lines (beginning elevation ~4200 feet) on ungroomed trails

Season: December-March

Dog Friendly: yes, in fact our dogs got spoiled with attention and were complimented for being so well behaved :)

Pros: great views of Mt. Hood; relatively easy; tons of sledding hills

Cons: busy, busy, busy

white river mt hood

The view from the parking lot was beautiful too

From the parking lot you follow the masses along a road/path along the river and passed several sledding hills, one of which you actually hike up…and would be a total pain on cross country skis. This sledding hill is really the most difficult part of the snowshoe and you probably won’t even notice yourself huffing and puffing as you watch all of the tubers flying by.

white river sledding

The sledding hill and most challenging part of the snowshoe.

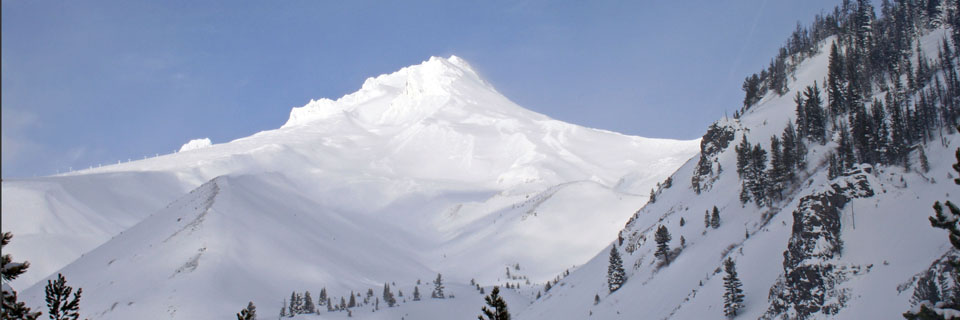
Continue along, either on the trail or off, if you prefer, until you reach the power lines that power Mt. Hood Meadows Ski Resort. If you turn around at the power lines you will have completed about a 3 mile roundtrip. For more fun, continue further up the hill toward the mountain…you will be rewarded with amazing views of Mount Hood.

white river autumn and steve

Stopping for a break and a photo.

On the way down Angie decided to give Sal a great big hug…so we took another picture.

white river angie and sal

Hugs!!!

The parking lot was still very full with families out having Christmas Eve fun and with the volunteers, medical teams, and sheriffs department that were out looking for the lost snowshoers. Just makes you realize how important it is to be prepared and to pack the 10 Essentials.

white river rescue

Portland Mountain Rescue, new trucks and the “entire” Hood River Sheriffs department were all still on the mountain when we were heading out.

We really can’t wait till we get to go snowshoeing again…hopefully it will be sooner rather than later.

A note about snowshoes: Steve and I have both been using the MSR Evo Snow Shoes
and they rock. They get awesome traction and just the right amount of “float” and they even have “tails” that you can add on if you need some extra lift. Bottom line…they rock and they aren’t nearly as expensive as some of the others. We also added a couple extra strap bindings to ours, so now they are super secure and never come undone. If you just want to try out snowshoeing rentals are usually super cheap…usually about ten bucks a day.

Don’t forget your Sno-Park pass!!!

Resources

Directions and Sno Park info


Eagle Creek

eagle creek punchbowl falls

Punchbowl Falls from the Eagle Creek Trail…if you hike down the Lower Punchbowl Falls side trail you get an even better view of the falls.

Eagle Creek is one of those hikes that is beautiful year round…even in the rain. The trail itself is pretty easy as long as you don’t mind steep drop-offs on one side and the occasional section of slippery wet rocks. The trail follows Eagle Creek up a narrow gorge and can be done as an easy day hike or a (much) longer loop. I’ve hiked as far as Tunnel Falls, but plenty hike up to Wahtum Lake and turn it into an overnighter. I would love to do this hike as a overnighter…it’s so close to Portland….and there’s only a small (a handful of miles) section where you’ll actually break a sweat. Could I convince Steve to go on a winter camping trip? As always, don’t leave anything valuable in your car, let someone know where you’ll be hiking and stay safe by packing the 10 Essentials.

Quick Stats

Distance: ~4 miles to Punchbowl Falls roundtrip; ~8 miles to Tenas Camp roundtrip; ~13 miles to Tunnel Falls roundtrip; ~28 miles to Wahtum Lake roundtrip; 25 miles for the Eagle Creek-Tanner Butte Loop (28 miles or so for the others…depending on side trips)

Time: 2hrs. to Punchbowl rt.; 3 1/2 hrs. to Tenas Camp rt.; 5 hours to Tunnel Falls rt.; 2 days backpacking trip to Wahtum Lake, or 2-3 days to do the Eagle Creek-Tanner Butte Loop (or many of the other loops ie. Ruckle Ridge, Herman Creek, etc.)

Difficulty: Eagle Creek to Tunnel Falls is relatively easy…beyond is moderate to difficult (Ruckle Ridge is more challenging)

Season: Year round to Tunnel Falls; beyond you’ll need snowshoes Nov/Dec to Apr/May and GPS or excellent route finding skills

Dog Friendly: Steep drop-offs….we took ours and plenty of people do, but if your dogs act like a furry tornado when on the trail you might want to rethink taking them

Pros: waterfalls, views of the Columbia River Gorge, clear streams and pretty little lake

Cons: BUSY trail (Eagle Creek) and isolated parking area ie. don’t leave valuables in your car

The trail from Eagle Creek to Punchbowl Falls gradually gains elevation as it follows the creek up the canyon. Stretches of the trail are on sheer drop-offs (in some places there is a cable to hold on to for those who need it) while other sections meander through the forest.

eagle creek ferns

Ferns line the Eagle Creek trail.

I definitely recommend hiking down to the Lower Punchbowl Falls viewpoint…it’s postcard perfect. I unfortunately don’t have pics because I have no idea where I put them…so you’ll just have to “google it.”

Pretty Loowit Falls is across the canyon from the trail….it has a pretty and scenic pool…if only there was a way to reach it.

Loowit Falls on the Eagle Creek trail

I always love that pool in the middle of the falls…for some reason I always want to swim in it, too bad it’s not possible

Once you reach High Bridge the canyon narrows and becomes deeper and then widens out a bit before reaching Tunnel Falls. On the way to Tunnel Falls you’ll pass Tenas Camp which is approximately 4 miles from the trailhead.

eagle creek view from high bridge

Here is the view from High Bridge

On our most recent hike (from which these pics were taken) we turned around at the bridge just passed Tenas camp because we had started late and didn’t want to get caught in traffic…and it was December and we didn’t hit the trail until around one and we didn’t want to be hiking back in the dark with our black dogs.

eagle creek wet trail

This trail is wet from fall through spring, so be prepared to get splashed, trickled on, rained on….it’s all part of the experience.

I apologize for the lack of pics, but I can’t seem to find any of the pics from previous Eagle Creek hikes. I know they’re here somewhere….I just don’t know where, so until then this is all I have to post.

eagle creek trail

Just so you get an idea…this trail really does have some steep drop-offs….in this spot the trail is fairly wide, but that’s not always the case….

If anyone has any tips or pointers about doing Eagle Creek as a loop including Wahtum lake I would love to hear them. I would love to do a winter hike/snowshoe before we leave on our big trip.

2012 Gift Ideas for the Adventurer in Your Life

Yep, it’s that time of year again. Time for Black Friday madness, Cyber Monday and American consumerism at its finest. Here are some great gift ideas for the adventurer in your life.

1. GoPro HD HERO2 or GoPro HD HERO3….so they can capture all of their insane adventures…in HD.

2. Sea to Summit eVent Compression Dry Sack or the even lighter Granite Gear eVent Sil Compression DrySack. Whether they’re hiking in Olympic National Park, trekking across Borneo or circumnavigating an island these will keep clothing and gear packed tight and dry.

20120217-085439.jpgGranite Gear Drysack

3. A waterproof watch like a Timex Expedition or Ironman.

4. A rugged camera like the Olympus TG-1iHS 12 MP Waterproof Digital Camera which claims to be waterproof to 40 ft., drop-proof to 6.6 ft., freeze-proof to 14°F and crush-proof to 220 pounds.

5. A compressible fleece or jacket like the Patagonia Re-Tool Snap-T® or Patagonia Down Sweater. They will love having a super warm and cozy layering piece on their next backcountry outing or summit attempt.

6. DeLorme Earthmate PN-60w with Topo North America and Map Pack and DeLorme inReach Two-Way Satellite Communicator. We LOVE our Earthmate it’s super easy to use and it works really well…even in really remote locations. Our’s is a slightly older model, but the new one combined with the inReach will give everyone some peace of mind…especially if your adventurer is an adrenaline junky, solo backpacker….or slightly reckless. The inReach allows them to send out messages saying they’re okay…or if they’re in need of help.

7. Whether they’re needing to purify water high in the Himalayas or in the backcountry of Eastern Oregon a water purification system like a SteriPEN with pre-filter makes it ridiculously easy.

8. A collapsible, foldable, backpack like the Gregory Miwok 22 Daypack that can be used for daytrips from camp or early morning summits.

9. A fleece lined wool beanie like the ones from Patagonia have an awesome fit and will keep them warm without being itchy.

10. Stocking stuffers like hand warmers, energy gels, carabiners, lithium batteries will also be greatly appreciated by your adventurer.

Five Mile Butte Fire Lookout Snowshoe

five mile butte lookout

The lookout was super cozy and we loved having a wood stove….

Activity: Snowshoe or cross country ski

Distance: 6 miles roundtrip

Time: couple of hours each way

Difficulty: moderate

Season: December to April (booking season is a little longer)

Dog Friendly: Yes, the fire lookout is exposed and the stairs are steep…Jedi cried the first couple of times going up and down the stairs…so we had to drag and/or carry him. Eventually he got it.

Pros: You’re out in the middle of nowhere, snowshoeing, sledding, wood stove, 1 bed + 1 cot, some utensils provided, firewood provided, easy to navigate to

Cons: No electricity, no running water, going out to the vault toilet when it’s below freezing, shorter season due to lower elevation

mountains peeking through the clouds

A couple mountains peaking through the clouds on the road up to Five Mile Butte fire lookout.

To get to the fire lookout it’s a 3 mile hike along a road that begins across from the Billy Bob Sno-Park. The lookout sits at 4,627 feet and when it’s not cloudy there are some great mountain and forest views along the way.

five mile butte break

Taking a break on the road up to the fire lookout.

As the hike is a solid three mile uphill trek we stopped for a couple of breaks along the way. In early December, when we went, there wasn’t a ton of snow, but it was definitely icy and we were happy we brought our Black Diamond Trekking Poles and MSR Snowshoes.

five mile butte access road

View of the access road from the lookout.

We made it!!! The lookout sits about 40 feet off the ground and has some pretty steep and narrow stairs. We were happy to have the wood stove because the temperature was dropping fast and we wanted to melt some snow to make warm drinks. My Sorel Pac Boots boots were super comfy and warm….no cold toes for me.

frozen tree at five mile butte lookout

Pretty frozen tree reminds me of the holidays

We spent most of the evening reading over the old guestbooks, chatting, and drinking spiked apple cider and hot cocoa. The lookout stayed toasty all night long and we all slept great.

five mile butte sledding

We found a beat up plastic sled in the wood shelter and took advantage of the icy conditions.

We found a sled in the wood shed and had to get a couple of good runs in before we headed out for the day. The dogs were a little freaked out by it…but we had a great time!!!

five mile butte sledding steve

Super slick sledding….thank goodness for the sports setting on my camera!!!

five_mile_jedi

Jedi rocking his ice beard after our hike back down from the lookout.

Back at the Sno-Park we finished off the last of our hot chocolate…that was still piping hot after all of our sledding and the hike out. The dogs stayed toasty with their packs layered over their winter jackets and were rewarded for all of their hard work with some treats when we got back to the car.

Horsetail Falls to Triple Falls

The rain is here, so we better embrace it. What better way to embrace it than to go for a Columbia Gorge waterfall hike and follow it up with a pint on the way back to town. At about 5 miles long and only 700 feet of elevation gain it’s possible to finish this hike in about 2 1/2 hours.

Horsetail Falls

Horsetail Falls off of the scenic highway in the Columbia River Gorge

Quick Stats

Distance: 5 miles roundtrip

Time: 2 1/2 hours

Difficulty: Easy to Moderate

Season: Year round

Dog Friendly: Yes, there are a couple spots for them to wade/drink along the way and the trail is mostly packed dirt, a little rockier near Triple Falls, but nothing an experienced pup can’t handle

Pros: 4 waterfalls, beautiful forest, Oneonta Gorge and proximity to Portland

Cons: I can’t think of any

Permit: None needed

After finding parking at Horsetail Falls, follow the gravel trail .2 miles beyond an informational sign and keep right at the junction. After not too much further you’ll come across Ponytail Falls. The trail passes behind the falls, through a grotto, where moisture drips from the ceiling and a fine, cooling mist spray up from the falls….prepare to get damp.

Ponytail falls on trail to triple falls

Ponytail falls on the trail to Triple Falls

There is a stunning, mossy weeping rock about a mile passed Ponytail falls and from here the trail continues on a bridge across Oneonta Gorge.

triple falls wildflowers

Wildflowers on the trail to Triple Falls in the Columbia River Gorge

Shortly after crossing the bridge there is another junction, turn left and head up the hill about another mile to Triple Falls.

triple falls trail

Typical portion of trail on the hike to Triple Falls

Triple Falls makes a great picnic stop and if you continue above the falls there are a couple of swimming holes great for a dip (if it’s warm and sunny).

triple falls

Triple Falls

Triple falls columbia gorge view

View of the Columbia River Gorge from the Triple Falls trail

Planning Resources

Opal Creek

This is one of those quintessential Oregon hikes. It has tons of trees and a beautiful creek with crystal clear water. Opal Creek and the surrounding area has been important historically, as well. The area was an important area for trade when the Santiam Indians would set up their summer camp here, then the area became an important mining area. The old mining company eventually ended up donating approximately 4000 acres to The Friends of Opal Creek to help preserve Opal Creek, the Little North Santiam River and the surrounding forest. Relics of the old mining industry and the old saw mill dot the trail and are scattered about Jawbone Flats. This hike is also super easy.

Opal Creek Hike: Little North Santiam River and Sawmill Falls

Opal Creek Hike: Little North Santiam River and Sawmill Falls

Quick Stats

Distance: 7 miles roundtrip to Opal Pool and 10.5 miles roundtrip to Cedar Flats; you could do this as an easy late season backpacking trip if you camped at Cedar Flats.

Time: 2 1/2 hours roundtrip to Opal Pool and probably about 5 hours roundtrip to Cedar Flats

Difficulty: easy

Season: end of March to mid-November, depending on snowfall

Permit: Northwest Forest Pass $5/day or $30/year

Dog Friendly: Yes, the trail is wide enough that you don’t have to worry about them going over the edge, however the water is quick moving in places, so keep an eye on them.

Pros: Virgin forest and a beautifully clear stream, family friendly, lots of cool old buildings and random relics from long ago

Cons: Can be crowded on summer weekends, part of the trail is an old logging road…which makes for an easy, if slightly boring hike (thankfully there were pretty little streams and plenty of creepy crawlers to keep us occupied)

Note: We did this hike in June and there was still snow past the bridge that’s a mile beyond Opal Pool. The bridge was also taped off with caution tape. We crossed anyway, but didn’t get far as we were post-holing with every step.

Plan on getting an early start for this hike. It’s about an hour and a half from Portland.

The Hike

The trail begins at the end of potholed Little North Santiam Road. Park at the gate here and continue on the old logging road beyond the gate. There are some seriously old trees here, one they claim that is between 700 and 1000 years old and plenty with diameters larger than I am tall!!! Awesome!!!

opal creek sawmill

An old building on the Opal Creek trail to Jawbone Flats

At about two miles in you will come across the remnants of the old sawmill and if you follow the bootpath over to the river you will see Sawmill Falls. Continue on to Jawbone Flats where you’ll find historic cabins and some ancient rusted out vehicles.

opal creek jawbone flats company store

The “Company Store” at Jawbone Flats.

After Jawbone Flats, and the rusted out cars turn to the right toward the creek to visit Opal Pool, it’s about 1/10 of a mile past the cars.

opal creek above opal pool

Gorgeous deep Opal Creek

Cross the bridge above Opal Pool and continue left on a trail that follows along Opal Creek. About one mile up the trail crosses the creek on a bridge (that was taped off with caution tape) continue at your own risk. The bridge was stable “enough”, but the water moves pretty quickly down below. We crossed, but there was too much snow, so we ended up turning around and not making it to Cedar Flats. At Cedar Flats there are supposedly a few 1000 year old trees still hanging around, Maybe next time we’ll make it up there.

bridge over Opal Creek

Bridge over Opal Creek.

opal creek 1

Opal Creek

To return, continue back down the Opal Creek trail. Don’t cross back over to Jawbone Flats, but instead continue down the trail where it eventually crosses back over Little North Santiam River to meet up with the logging road that you came in on. Turn left on the logging road and continue  back to your car.

Opal Creek trees

Sunlit trees at Opal Creek

For more detailed hiking instructions check out these two books. They both have great trail info and history.

The Portland Hiker’s Field Guide is also a good resource.

Angels Rest

Angels Rest

Angels Rest viewed from the trail to/from Devil’s Rest

Quick Stats

Distance: 4.6 miles roundtrip (out and back)

Time: 2.5 hours

Difficulty: moderate

Elevation Gain: approx. 1400 feet

Season: All Year; might get snow on top during the winter months

Permit: none needed

Dog Friendly: Sort of, if you trust your dog around drop offs they will do fine. We always make sure to keep Sal and Jedi leashed when at the top.

Pros: Close to Portland, great views of the Columbia River Gorge, mostly shady except on the rock slide and on top, moderate grade

Cons: Busy trail

Angels Rest is one of my favorite hikes in the Portland area. It’s super close to town, it’s just long/hard enough to make you feel like you worked out, and the view on top is stunning. It’s a great escape from the city.

Angels Rest Looking East

the view from Angels Rest looking east at the Columbia River Gorge

To get there drive east on I-84 from Portland and take Exit 28/Bridal Veil. The trailhead parking is just to the right of the intersection with the Historic Columbia River Highway. The trailhead is marked and is opposite the Highway from the parking area.

The trail begins with a fairly moderate grade, continuing through the trees with the occasional view of the Columbia River Gorge or Coopey Falls. After about a mile the trail begins switchbacking as the grade steepens. Wildflowers line the trail until you cross a rock slide, which means you’ve almost made it to the top. Yay!

Angels Rest Caterpillar

Caterpillar on the Angels Rest trail.

All of that hard work and sweat will pay off. Follow the path toward the point, some easy scrambling will be involved, and enjoy the view. From Angels Rest you look across the river to Beacon Rock, Hamilton Mountain, and Table Mountain (which are all hikeable) and to the west you can see the Vista House. There is usually a nice breeze up top, so it’s a great place to enjoy the sunshine and eat your lunch before heading back to town.

Angels Rest looking westward

Angel’s Rest looking west

Although the hike itself is pretty moderate if you have creaky knees bring your trekking poles…you’ll be happy you remembered them on the return down. Steve swears by his Black Diamond Trekking Poles and uses them religiously…I however only use mine for trails that have miles of sustained downhill, so I didn’t pack mine and I was fine.

It’s also possible to reach Angels Rest from Wahkeena Falls, by doing the Devils Rest/Angels Rest Loop hike for a more challenging, longer day hike.

After your hike head in to Troutdale and grab a beer at McMenamins Edgefield…. the service will be mediocre, but occasionally they’ll have a couple of good beers on tap…and the grounds are good for wandering.

Resources

www.portlandhikersfieldguide.org


Broken Top Loop

Broken Top from Park Meadow

Broken Top from Park Meadow; Day 1

Quick Stats

Distance: 23+ (our hike was approximately 26.5)

Time: 3 days

Difficulty: Difficult

Season: End of July to beginning of October

Dog Friendly: To Golden Lake, yes; to Green Lakes, yes; Green Lakes to end of the loop, NO!!!

Pros: Gorgeous meadows, views of Broken Top, all Three Sisters, Mt. Jefferson, Mt. Washington, and Mt. Bachelor

Cons: Busy trail that is pounded to dust, off-trail section is over steep, sometimes loose rock, no water source on third day after leaving the glacier, no fire allowed at golden or green lakes

Day 1

The trail begins at a parking lot just before the Driftwood Creek Campground at Three Creeks Lake. For the loop follow the signs to Park Meadow. The dusty trail will switchback up to the ridge where you might get a glimpse or two of the surrounding mountains before descending to the Snow Creek irrigation ditch and a four way junction, turn left here and continue onward to Park Meadow. Y

ou will be greeted with wildflowers, a view of Broken Top, and pretty Park Creek. This is a great place to take a break and refill water. You’ve made it about 6.4 miles at this point. Cross the creek and continue gradually uphill.

Park Meadow Broken Top

View of wildflowers and Broken Top from Park Meadow.

At about 7.2 miles there is a dusty unsigned trail that leads to Golden Lake, your camp for the night, once you reach the lake cross the outlet creek on the left and continue a bit further to the inlet creek, here follow a boot path up along the creek to some amazing campsites.

Golden Lake Camp

Our camp above Golden Lake with Broken Top in the background.

We camped near the creek about a mile or so up the hill, but it’s rumored there are a couple of tarns just a bit further that have even better views. We, however, were exhausted and decided that our unofficial campsite with views of Broken Top and South Sister was perfect.

Golden Lake, Middle and North Sister

The view on our hike back down the hill from our campsite shows Middle and North Sister reflected in Golden Lake.


Day 2

Make sure to wake up early to watch the morning sun dance across the mountains and light them up with a red glow. Today, hike back down to the main trail and take a left. The trail will ascend to about 7000 feet at a pass between Broken Top and South Sister and then descends again into the Green Lakes Basin. The basin is super crowded, has designated campsites, and fires are prohibited so I recommend continuing on to camp closer to the day 3 push up Broken Top.

Green Lakes Basin

The parting view of Green Lakes Basin looking toward the pass you just came from.

Meadow, Green Lakes, Broken Top

Meadow with a great creek for refilling water bottles with Broken Top in the background.

Once you leave the basin the trail continues through meadow and open forest, so make sure your water supplies are good. You will come to a Y in the trail, keep to the left toward Broken Top. Once you reach Camp Creek and the Drainage start looking for a place to camp. The better camps are uphill, but there is one nice camp about a ¼ mile down the drainage, that has a nice sheltered meadow, that was perfect for an afternoon nap.

Day 3

Today is going to be long, hot and exposed, so start early and put on some sunscreen!!! Make sure ALL of your water bottles/platypus bags are full, and I recommend filling up before you leave Camp Creek behind and at any other decent source of water before you reach the Tam McArthur Rim Trail because there is NO water once you reach the rim, it’s 7+ miles without water.  To reach the Bend Glacier and the iceberg filled lake that it fills, follow Camp Creek till it starts to level off and then head east toward a rock outcropping, we hiked just to the right of this and were able to pick up a trail that we followed nearly all the way to the lake.

View of Mt. Bachelor from Broken Top boot path

View of Mt. Bachelor from the boot path leading up to the lake in front of Bend Glacier. At this point you’re almost to the lake.

Frozen Lake on top of Broken Top Mountain

Hey look, there are wildflowers even up here near this partially frozen lake on Broken Top.

After you leave the lake, begin the long hot push to the rim trail. Take care crossing the snowfields and remember that big rocks move too. Once you reach the rim “trail” you will have amazing views of all the surrounding mountains. The path here is sketchy and kinda comes and goes as you climb over and around rocks; I promise that the trail gets better the further east you go. Just continue on the trail, through the dust, and dry forest.

Broken Top Views to the North

So, I finally dragged my ass up the hill to the rim and it was totally worth it. You know it’s been a hard hike if Sal is resting in the shade. From up top you can see the Three Sisters, Mt. Washington, and Mt. Jefferson to the North and Mt. Bachelor….and maybe Mt. Thielson to the South. Beautiful!!!

Tam McArthur Rim

This pic makes the trail look “not so bad” don’t be fooled; day three is a pretty crappy hike and you’ll be wondering how you got sucked into it.

Our poor dog Jedi, would race to each shady spot and lie down. I would NOT recommend any part of day 3 for your pup, if you must take your dog invest in booties, joint supplements and take some baby aspirin with you as well. I wish someone had warned us. Steve and the dogs finished their water less than halfway through the day’s hike, so we were left to ration out the remaining 1 ½ Liters that I still had. We were very relieved to get back to the car, blast the AC and get rehydrated.

GPX File of Our Hike

I’ve included a link to a GPX file of my hike around Broken Top as recorded by my Delorme Earthmate PN-60. You can load this file into Google Earth or any GPX-compatible GPS device to follow my path.

Download the Broken Top GPX file here

Photo Aug 23, 16 50 36 Photo Aug 23, 16 51 17 Photo Aug 23, 16 53 02 Photo Aug 23, 16 53 36 Photo Aug 23, 16 55 13 Photo Aug 23, 16 55 27 Photo Aug 23, 16 55 53 Photo Aug 23, 16 56 47

Planning Resources

US Forest Service Central Oregon Website great for general info and trail conditions

Portland Hikers Field Guide a great resource for trip reports, tips, and insider info