Jefferson Park Wilderness

Quick Stats

Distance: 13 miles

Time: 2+ days

Difficulty: moderate to difficult (approx. 3000 ft. gain)

Season: July to October

Permit: Northwest Forest Pass required

Dog Friendly: Yes, the trail doesn’t have much for steep drop offs, there is regular water access, and plenty of shade (aside from a couple sections that seem unrelenting) Note: some sections are kinda rocky…so know your pooches limits…especially if they have sensitive paws. Our dogs were plenty excited for a post hike swim…and it was hard to keep them out of the water.

Pros: Wildflower filled meadows, multiple stream crossings for yourself and your furry friends, views of Mt. Jefferson, alpine lakes

Cons: Busy…tons of people…and what they leave behind. We ended up burning a bunch of TP…it seems many of Jefferson Park’s backpackers have forgotten the principle of leave no trace; there is also a fire ban usually util September or October. We hardly passed anyone on the South Breitenbush trail, but Jefferson Park was quite busy.

View of Mt. Jefferson

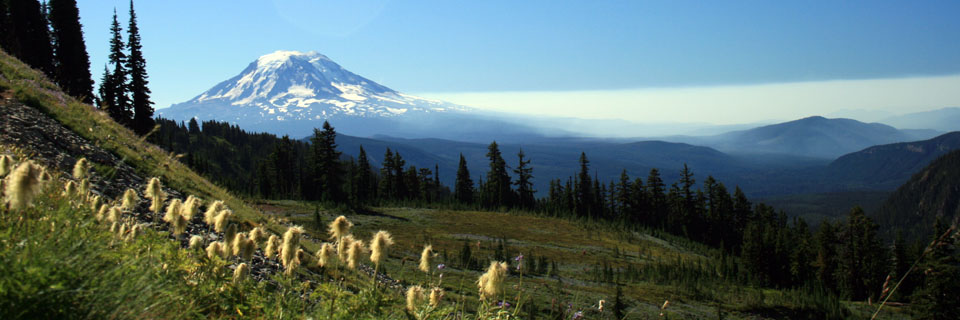
One of the many great views of the mountain.

Jefferson Park is one of those fabled gems that my parents still speak fondly of…many, many years after their first visit. And it’s true, the scenery is absolutely stunning and so worth every ounce of sweat to get there. Following the South Breitenbush trail you’re graced with a rushing river, a damp forest, open vistas, meadows bursting with wildflowers, views of Mt. Jefferson, and crystal clear alpine lakes….what more can a backpacker ask for? Well, I guess some solitude would be nice too.

mt. jefferson and jefferson park

Even Sal stopped to admire the view.

Most people take the Whitewater trail or the Park Ridge trail into the park, but we wanted a more challenging hike with fewer people, and that’s exactly what we got. There was only one other car in the parking lot and when we hiked out the next day there were only two other cars. I would definitely hike this trail again, but I am interested in checking out the other two as well.

Over the first 1 1/2 miles the trail passes multiple little creeks and begins gaining elevation pretty quickly. The trail continues on a generally uphill path for the next few miles. If you’re feeling inclined to punish yourself further at about two miles in there is a junction with the Bear Point trail…I’m sure there are great views, but we simply weren’t interested.

After the Bear Point junction the trail gets steeper, rockier and more exposed. If you’re game to leave the trail by a couple of dozen feet you might find a partial view of Mt. Jefferson.

Jefferson wildflowers

Tons of wildflowers carpeted the meadow just before reaching Jefferson Park.

Once you’re about 3 1/2 miles in you’ll stumble into a gorgeous meadow and you’ll forget all about the trudge up the hill. The  trail meanders through the meadow, running along the streams and around little ponds.

jefferson flowers2

Still more flowers!!! and a view of one of the neighboring buttes.


After about three miles more you will finally enter Jefferson Park with it’s postcard perfect views of the mountain and it’s jewel toned lakes. There are three main lakes here: Russell, Scout and Bays. It’s important to note that camping is ONLY allowed at the spots marked by a post. The area has been loved to death by it’s biggest fans, so please tread lightly, leave no trace, and respect the wilderness. Park rangers are more than happy to fine those who build a fire (during the ban) and/or camp outside the designated spots.

jefferson view from camp

Our view from camp overlooking Russell Lake.

To complete the hike, you simply return the way you came.

jefferson park lakes

Peek-a-boo views of the lakes entice you to wander.

Mt. Jefferson with Russell Lake

Mt. Jefferson with Russell Lake in the foreground.

There are many options for daytrips from Jefferson Park and I think it would be worth it to stay an extra day or two. You could hike up to Park Ridge for the view of Mt. Jefferson, explore the many lakes, amble along a section of the PCT…you get the picture.

I’m Afraid of Heights… Backpacking the Enchantments

Leprechaun Lake in the Enchantments

Leprechaun Lake with McClellan Peak in the background

Quick Stats

Distance: 21+ miles roundtrip (18 miles as a through hike); side trips abound

Time: 3+ days

Difficulty: moderate to Upper Snow Lake; very difficult to the Enchantments

Season: Mid-July to Mid-October

Dog Friendly: No, dogs are prohibited due to a fragile ecosystem, the native mountain goats, and tricky, steep hiking/climbing

Pros: Mountain views, crystal clear alpine lakes, larches, mountain goats, toilets, and no horses.

Cons: Can be crowded at times (permit system helps), tricky and dangerous rock scrambles, mosquitos early in the season, toilets, and fires are prohibited

Permit: Yes, you need a permit to camp in any of the enchantment zones and even to day hike into the Enchantments. Backpacking permits can be acquired at recreation.gov (must be picked up by 9 am on the day of your hike (or the night before) or it will be given away to another group, while day hiking permits can be acquired at the ranger station in Leavenworth…I assume. After closing hours the ranger station stores permits in a box outside its door which allows you to pick up your permit the night before and get an early start on the trail.

To celebrate fall Steve and I decided to take some time off and head up to Leavenworth, (a cute little Bavarian style town… aka a tourist trap) about a 5 hour drive north from Portland, to see the larches in their golden glory up in the Enchantment Lakes.

Fall Color in the Enchantments

Fall color in the Enchantments

Prusik Peak Larches

The larches in all their glory in front of Prusik Peak

 The Hike

So the real reason you’re here. You’re curious about the hike that left me hobbling around town for days afterward. Hiking in to the Enchantments from the Snow Lake trailhead makes you REALLY earn those lakes. The Snow Lake trail is longer than the Colchuck Lake/Aasgard Pass trail and it starts at a lower elevation.

Looking toward Leavenworth on the Snow Lake Trail

Looking toward Leavenworth on the Snow Lake Trail

Day 1 (8.5 miles)

After a relatively late night drinking beer in Leavenworth Steve and I ended up starting on the trail a little later than we had intended. We were happy to see that the wind had blown most of the smoke from the Wenatchee Complex and Cashmere Mountain fires out of the valley and were able to breathe freely as we hauled ourselves up the hill with our overloaded packs.

Nada Lake on the Snow Lake Trail

Nada Lake on the Snow Lake Trail (5000 ft. elevation)

The hike from the Snow Lake Trailhead to Nada Lake is essentially all uphill with switchback after switchback for 5 ½ miles gaining 3600 feet. There are a few pretty campsites at Nada and the lake itself is stunning. From Nada Lake the trail continues uphill gaining another 400+ feet switchbacking up a talus slope until dropping in to the Snow Lakes.

Talus Slope Switchbacks on Snow Lake Trail

Talus slope switchbacks on Snow Lake Trail

We camped at the very far end of Upper Snow Lake, just before the stream crossing, so we would be able to get an early start on our dayhike up to the Enchantments. We made it to camp just in time, the wind was starting to pick up and the temperature was dropping fast.

Snow Lake Hammock

Steve was finally able to try out his new hammock

Steve made quick time hanging up his new ENO Hammock and we were able to chill and drink whiskey spiked apple cider while we watched the last rays of sun light up the hillside across the lake and turn the sky a brilliant orange. Exhausted from our hike we retired to our sleeping bags by nine….no card games played and no stories told.

Day 2 (4 miles)

We knew this day would be the hardest; in fact it made Day 1 look like a cake walk. The “hike” from Snow Lake up to the Enchantments is as psychologically challenging as it is physically. I had never considered myself to be afraid of heights….and maybe I’m not, but I am definitely afraid of falling.

The Trail Disappears

The trail in to the Enchantments literally disappears beneath your feet

The trail from Snow Lake up to Lake Viviane had me questioning whether I should continue or not. The “trail” follows rock cairns across granite slabs where a missed step could send you careening over a cliff. In places, foot holds have been blasted into the rock and cement “steps” have been put in place to make it easier, but it is not easy…I found myself using my hands more often than not and spider crawling more than I should have been. Steve loved the challenge, while I just wanted to get up to the lakes so I could be on flat ground and away from a cliff edge for a bit. The first lake you reach is Lake Viviane which is flanked by Mount Temple and Prusik Peak.

Viviane Lake Larches

Beautiful fall color at Lake Viviane

When we reached Lake Viviane I was convinced we were in the clear, but no…we still had to finish climbing up the granite…. affectionately called “Trauma Rib” to reach the remaining lakes. Once in the basin my heart rate slowed and I dug my camera out of my pack and started taking pics.

Prusik Peak and the Temple

Prusik Peak and the Temple

We passed by Leprechaun Lake, nestled between Lake Viviane and McClellan Peak, Sprite Lake, Perfection Lake and finally to Inspiration Lake before we turned around to head back to our campsite at Upper Snow Lake.

Little Annapurna above Perfection Lake

Little Annapurna above Perfection Lake in the Enchantments

Inspiration Lake

Inspiration Lake and the rock scramble to get up to the upper Enchantments

Perfection Lake with McClellan Peak

Perfection Lake with McClellan Peak

In hindsight I would have packed lighter, applied for a permit earlier in the year, so could have camped in the Enchantment Basin and would have stayed longer. There were tons of areas to explore if we had had more time: the Druid Plateau, Gnome Tarn, Crystal Lake, Shield, Earle and Mesa Lakes, summiting Little Annapurna, etc.

Snow Creek Valley from Enchantments

View of the Snow Creek valley from the Enchantments

Our second night was even colder than our first night at about 35 degrees Fahrenheit.

Surreal lighting at Snow Lake

Surreal lighting at Snow Lake

Day 3 (8.5 miles)

On day 3 we took our time packing up camp, but once we hit the trail we passed many different groups on their way up… including a couple packing their small child and a HUGE pack up to camp in the Enchantments for a couple of days. We had a hard enough time with just our daypacks and nothing makes you feel like a big wuss than seeing a family carry their baby with all their baby gear up; and to throw salt on an open wound we were passed by an elderly man who whizzed by us just as fast as the trailrunners. Ready for a beer and some food that hadn’t been freeze dried we hurried down the hill only stopping to strip layers and have the occasional snack.

GPX File of Our Hike

I’ve included a downloadable GPX file for the Enchantments based on our hike. Unfortunately, the batteries on our Garmen Earthmate PN-60 died during the second day so we don’t have tracks for the Upper Enchanted Lakes area. It’s not perfect, but at least it has a bunch of waypoints for the lower parts of the hike.

Download The Enchantments GPX File Here

Resources

Places to Eat, Drink and Camp in Leavenworth

Permit: www.recreation.gov

100 Classic Hikes in Washingtonby Ira Spring and Harvey Manning

Trekking Washington (Backpacker Magazine)by Mike Woodmansee

www.wta.org

Every Trail amazing trip report with waypoints


Goat Lake Loop

Mt. Adams from the Goat Lake trail

View of Mt. Adams from the Goat Lake trail

During September’s cold snap Steve and I decided it would be a good idea to hit the trails for a quick overnighter in the Goat Rocks Wilderness. Braving sleet and below freezing temperatures we hiked up to Snowgrass Flat, then over to Goat Lake and down Jordan Basin to complete a loop hike starting at the Snowgrass Trailhead.

Quick Stats

Distance: 13 miles (with tons of options for side trips, ours ended up being around 16 miles)

Time: 2 days or more

Difficulty: Moderate (only because of the exposure and 3000 ft. elevation gain)

Season: End of July to October

Dog Friendly: Yes, as long as they know to stay on the trail and are confident walking on narrow trails with steep drop offs

Pros: Stunning views of Mt. Adams, wildflowers, mountain goats, plenty of water

Cons: busy trail, horse use in places, weather can change quickly

Day 1

On the first day we hiked up to Snowgrass flat on trail #96, a pretty straightforward easy 4 mile hike. After continuing about a mile past the flat to find a site closer to day two’s destination, and finding the best sites already taken, we ended up backtracking to the flat and camping near a pretty little creek. Shortly after we set up camp a small storm blew in and brought with it sleet, hail and very cold temps. We were so happy we packed warmly and brought our waterproof gear.

Wildflowers at Snowgrass Flat

There were still tons of wildflowers in Snowgrass Flat

If we hadn’t been worried about the weather we could have done one of the great side trips on the PCT over to Cispus Basin or up to the summit of Old Snowy, both have been highly recommended by fellow hikers.

Wildflower filled meadow on Lily Basin trail between Snowgrass Flat and Goat Lake

Atleast our detour to find a suitable camp led us to this wildflower filled meadow on the Lily Basin trail between Snowgrass Flat and Goat Lake.

Day 2

As I was laying in the tent debating whether to leave my positively toasty Marmot sleeping bag or not, I looked up and thought “Wow, there’s no condensation we must have vented the tent really well.” NOT, all that condensation was FROZEN. The whole meadow had a frozen layer of frost/ice over it, but happily we woke up to a stunning view of Mt. Adams peeking through the trees on the other side of the flats. We were glad to see the skies had cleared and we would finally have some views. A hiker we passed on the trail said his thermometer read 22 degrees Fahrenheit….brr, no wonder everything was frozen.

Mt. Adams from Snowgrass Flat

Good morning and goodbye clouds. Our morning view of Mt. Adams.

Lily Basin Trail Sign

Continue on the Lily Basin trail to get to Goat Lake.

Wildflowers Goat Rocks Wilderness

Bring on the wildflowers; they’re never ending on the beautiful trail.

The hike over to Goat Lakes on the Lily Basin trail (#86) is pretty moderate, just a slow and steady uphill with spectacular views of the valley, wildflowers, and Mt. Adams. After about 3 miles you’ll reach Goat Lake, which was still partially frozen in September. If you’re lucky you might see some mountain goats up on the slope behind the lake; we saw at least 20 mountain goats above the lake.

Wildflowers with Mt. Adams in background

Didn’t I promise you views and wildflowers!!!

View of the valley from the Lily Basin trail before Goat Lake

View of the valley and Mt. Adams from the Lily Basin trail before you reach Goat Lake.


Goat Lake, Goat Rocks Wilderness

Goat Lake still partially frozen….maybe if you have really amazing eyes you can see the mountain goats on the slope behind the lake.

Hiking down from the lake the trail is fairly narrow and was even muddy in a couple places, so watch your step. If you turn around and look back the way you came you have a great view of Old Snowy.

Old Snowy, Goat Rocks WIlderness

Here’s your view of Old Snowy.

Less than a mile past the lake is a junction which takes you up to the top of Hawkeye Point and over to Lily Basin. To complete the loop continue straight and head down into gorgeous Jordan Basin,which looks like it just drops off at the base. There is a really pretty campsite near the bottom, although fairly exposed.

Jordan Basin, Goat Rocks Wilderness

The trail through steep Jordan Basin. The trail in this picture is characteristic of the trails on this loop hike.

Continue on trail 95 or to check out the Goat Ridge lookout detour to 95A which rejoins 95 as it heads back down to the start of your hike. To complete the loop either walk on the road back to your car or take the trail marked Snowgrass Flats that goes through Berry Patch and over to where your car is parked at the Snowgrass trailhead.

As you pack for this trip don’t forget the Ten Essentials and to pack your layers.

Planning Resources:

100 Classic Hikes in Washington
by Ira Spring and Harvey Manning

One Night Wilderness: Portland: Quick and Convenient Backcountry Getaways within Three Hours of the City
by Douglas Lorain

Washington Trail Association

Broken Top Loop

Broken Top from Park Meadow

Broken Top from Park Meadow; Day 1

Quick Stats

Distance: 23+ (our hike was approximately 26.5)

Time: 3 days

Difficulty: Difficult

Season: End of July to beginning of October

Dog Friendly: To Golden Lake, yes; to Green Lakes, yes; Green Lakes to end of the loop, NO!!!

Pros: Gorgeous meadows, views of Broken Top, all Three Sisters, Mt. Jefferson, Mt. Washington, and Mt. Bachelor

Cons: Busy trail that is pounded to dust, off-trail section is over steep, sometimes loose rock, no water source on third day after leaving the glacier, no fire allowed at golden or green lakes

Day 1

The trail begins at a parking lot just before the Driftwood Creek Campground at Three Creeks Lake. For the loop follow the signs to Park Meadow. The dusty trail will switchback up to the ridge where you might get a glimpse or two of the surrounding mountains before descending to the Snow Creek irrigation ditch and a four way junction, turn left here and continue onward to Park Meadow. Y

ou will be greeted with wildflowers, a view of Broken Top, and pretty Park Creek. This is a great place to take a break and refill water. You’ve made it about 6.4 miles at this point. Cross the creek and continue gradually uphill.

Park Meadow Broken Top

View of wildflowers and Broken Top from Park Meadow.

At about 7.2 miles there is a dusty unsigned trail that leads to Golden Lake, your camp for the night, once you reach the lake cross the outlet creek on the left and continue a bit further to the inlet creek, here follow a boot path up along the creek to some amazing campsites.

Golden Lake Camp

Our camp above Golden Lake with Broken Top in the background.

We camped near the creek about a mile or so up the hill, but it’s rumored there are a couple of tarns just a bit further that have even better views. We, however, were exhausted and decided that our unofficial campsite with views of Broken Top and South Sister was perfect.

Golden Lake, Middle and North Sister

The view on our hike back down the hill from our campsite shows Middle and North Sister reflected in Golden Lake.


Day 2

Make sure to wake up early to watch the morning sun dance across the mountains and light them up with a red glow. Today, hike back down to the main trail and take a left. The trail will ascend to about 7000 feet at a pass between Broken Top and South Sister and then descends again into the Green Lakes Basin. The basin is super crowded, has designated campsites, and fires are prohibited so I recommend continuing on to camp closer to the day 3 push up Broken Top.

Green Lakes Basin

The parting view of Green Lakes Basin looking toward the pass you just came from.

Meadow, Green Lakes, Broken Top

Meadow with a great creek for refilling water bottles with Broken Top in the background.

Once you leave the basin the trail continues through meadow and open forest, so make sure your water supplies are good. You will come to a Y in the trail, keep to the left toward Broken Top. Once you reach Camp Creek and the Drainage start looking for a place to camp. The better camps are uphill, but there is one nice camp about a ¼ mile down the drainage, that has a nice sheltered meadow, that was perfect for an afternoon nap.

Day 3

Today is going to be long, hot and exposed, so start early and put on some sunscreen!!! Make sure ALL of your water bottles/platypus bags are full, and I recommend filling up before you leave Camp Creek behind and at any other decent source of water before you reach the Tam McArthur Rim Trail because there is NO water once you reach the rim, it’s 7+ miles without water.  To reach the Bend Glacier and the iceberg filled lake that it fills, follow Camp Creek till it starts to level off and then head east toward a rock outcropping, we hiked just to the right of this and were able to pick up a trail that we followed nearly all the way to the lake.

View of Mt. Bachelor from Broken Top boot path

View of Mt. Bachelor from the boot path leading up to the lake in front of Bend Glacier. At this point you’re almost to the lake.

Frozen Lake on top of Broken Top Mountain

Hey look, there are wildflowers even up here near this partially frozen lake on Broken Top.

After you leave the lake, begin the long hot push to the rim trail. Take care crossing the snowfields and remember that big rocks move too. Once you reach the rim “trail” you will have amazing views of all the surrounding mountains. The path here is sketchy and kinda comes and goes as you climb over and around rocks; I promise that the trail gets better the further east you go. Just continue on the trail, through the dust, and dry forest.

Broken Top Views to the North

So, I finally dragged my ass up the hill to the rim and it was totally worth it. You know it’s been a hard hike if Sal is resting in the shade. From up top you can see the Three Sisters, Mt. Washington, and Mt. Jefferson to the North and Mt. Bachelor….and maybe Mt. Thielson to the South. Beautiful!!!

Tam McArthur Rim

This pic makes the trail look “not so bad” don’t be fooled; day three is a pretty crappy hike and you’ll be wondering how you got sucked into it.

Our poor dog Jedi, would race to each shady spot and lie down. I would NOT recommend any part of day 3 for your pup, if you must take your dog invest in booties, joint supplements and take some baby aspirin with you as well. I wish someone had warned us. Steve and the dogs finished their water less than halfway through the day’s hike, so we were left to ration out the remaining 1 ½ Liters that I still had. We were very relieved to get back to the car, blast the AC and get rehydrated.

GPX File of Our Hike

I’ve included a link to a GPX file of my hike around Broken Top as recorded by my Delorme Earthmate PN-60. You can load this file into Google Earth or any GPX-compatible GPS device to follow my path.

Download the Broken Top GPX file here

Photo Aug 23, 16 50 36 Photo Aug 23, 16 51 17 Photo Aug 23, 16 53 02 Photo Aug 23, 16 53 36 Photo Aug 23, 16 55 13 Photo Aug 23, 16 55 27 Photo Aug 23, 16 55 53 Photo Aug 23, 16 56 47

Planning Resources

US Forest Service Central Oregon Website great for general info and trail conditions

Portland Hikers Field Guide a great resource for trip reports, tips, and insider info