Lobster Mushroom Bisque


pacific-northwest-lobster-mushrooms

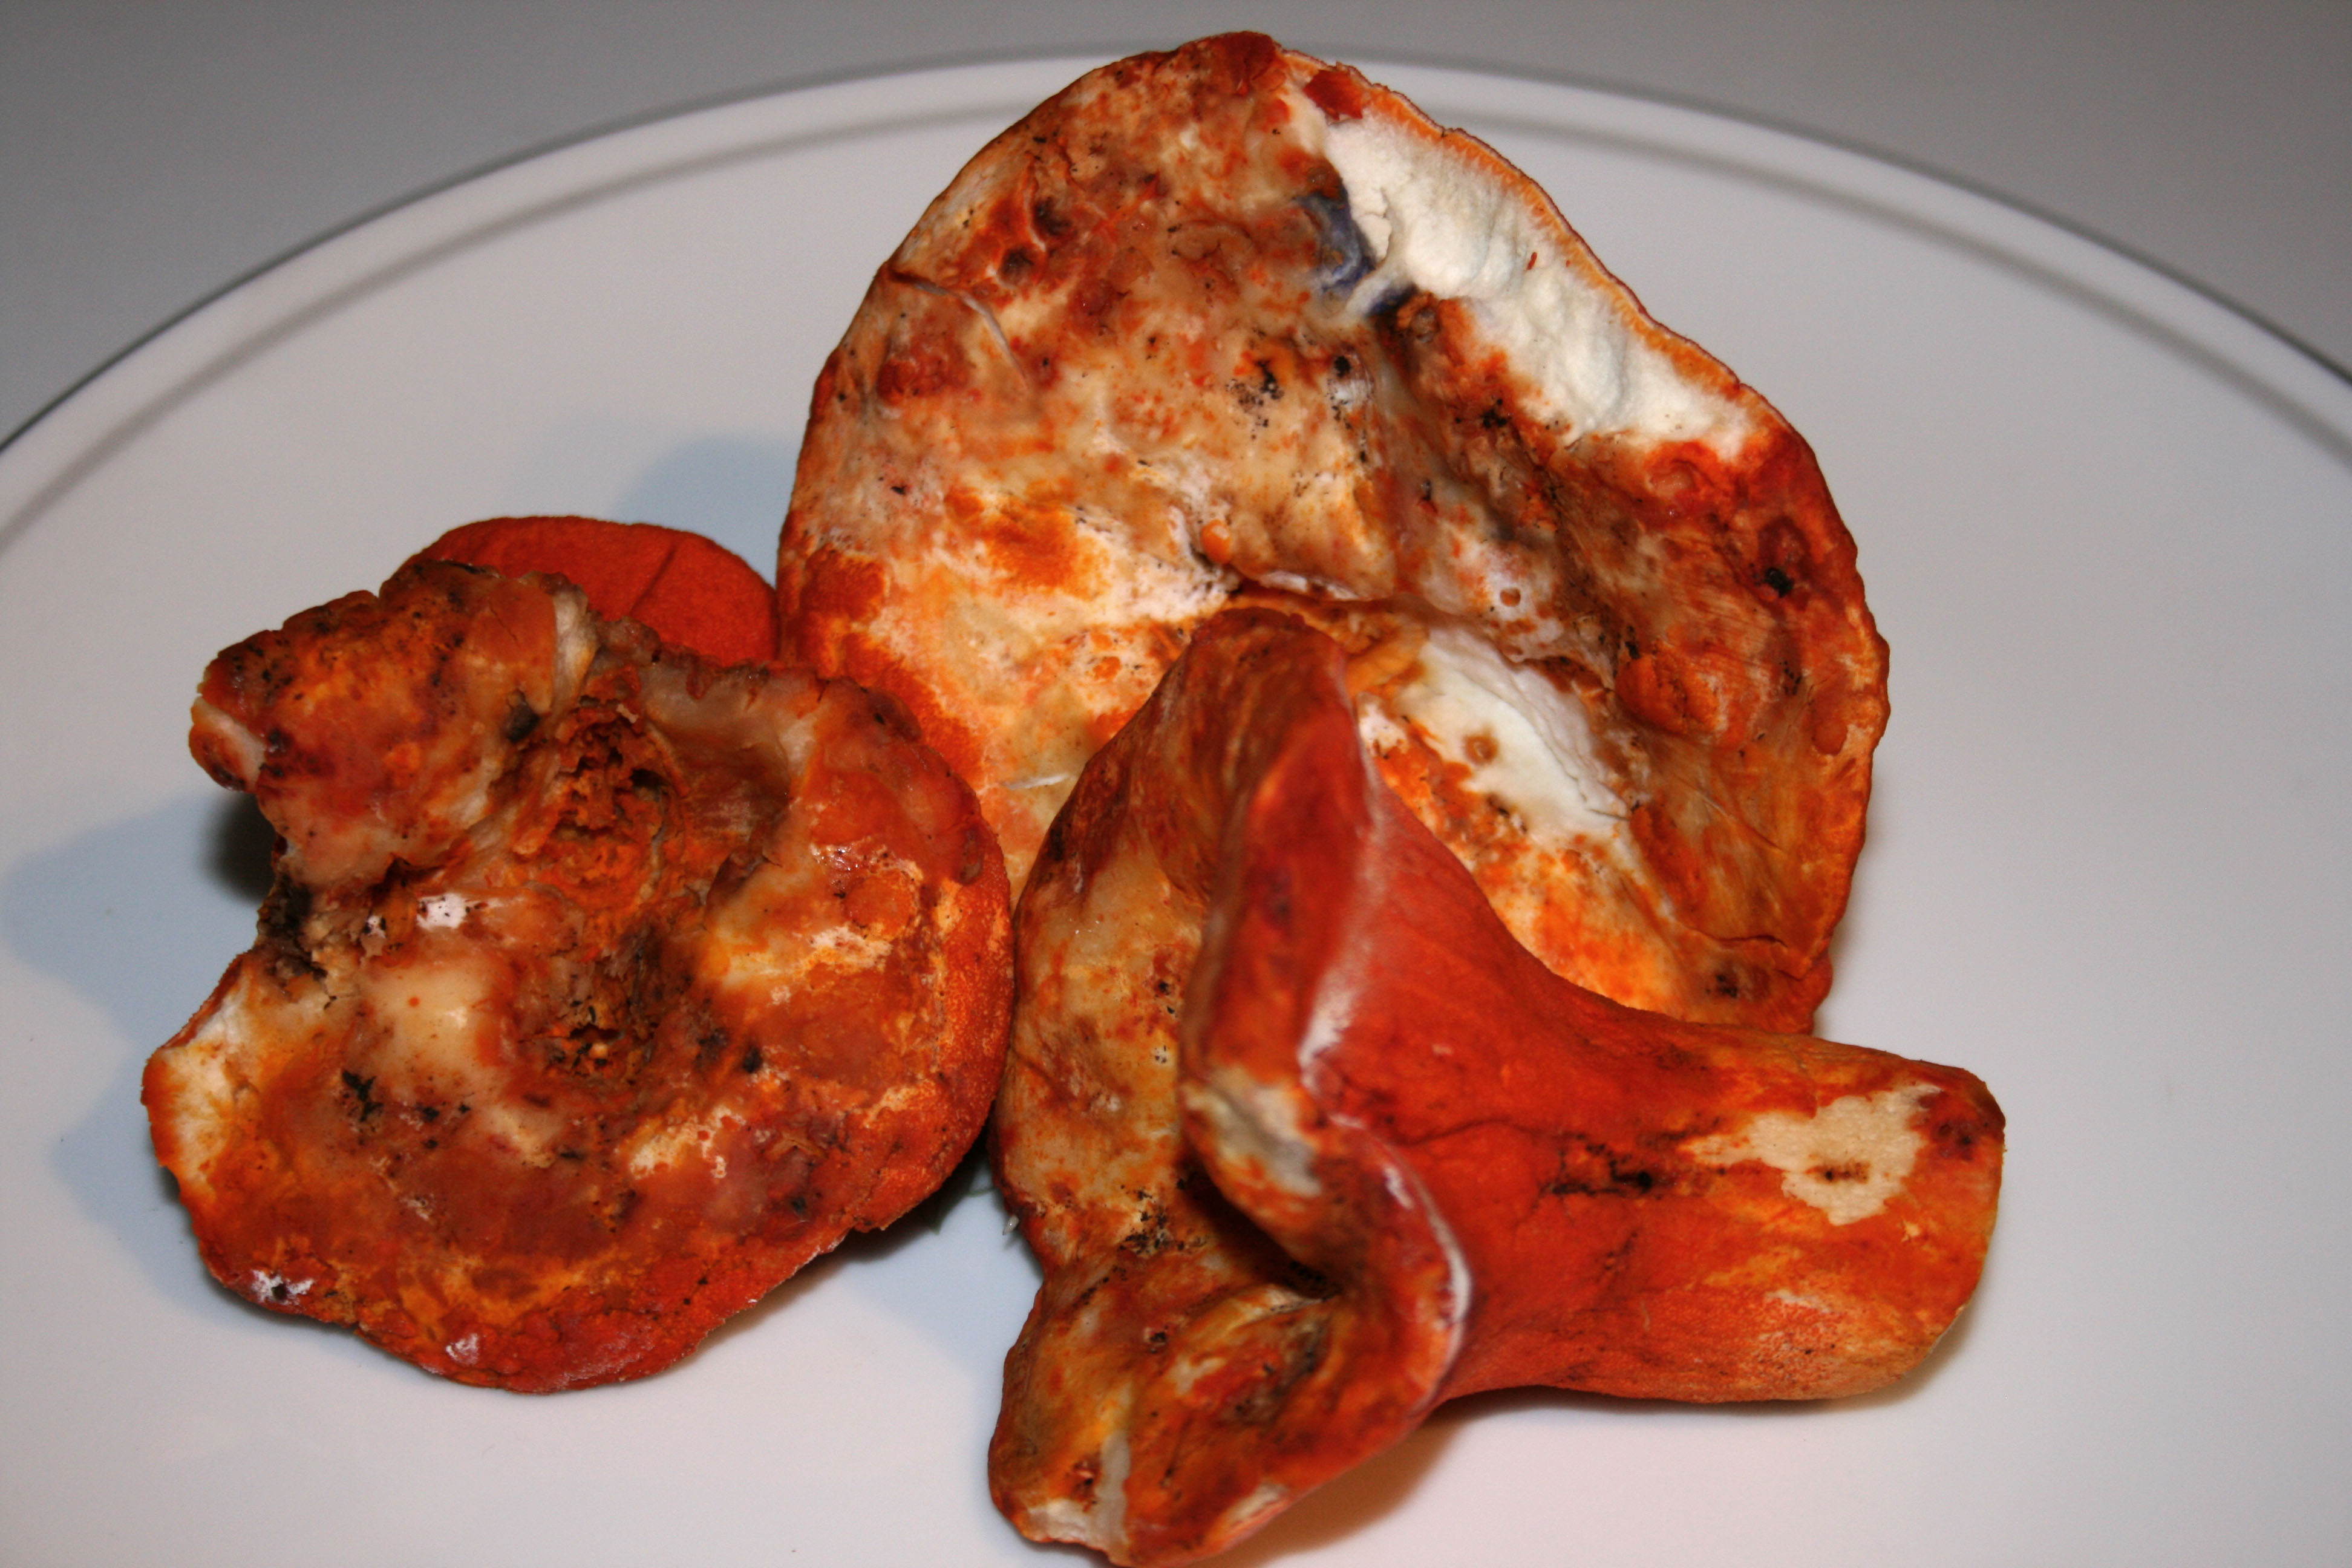
Mushrooms infected by parasitic ascomycete fungus….my favorite!!!

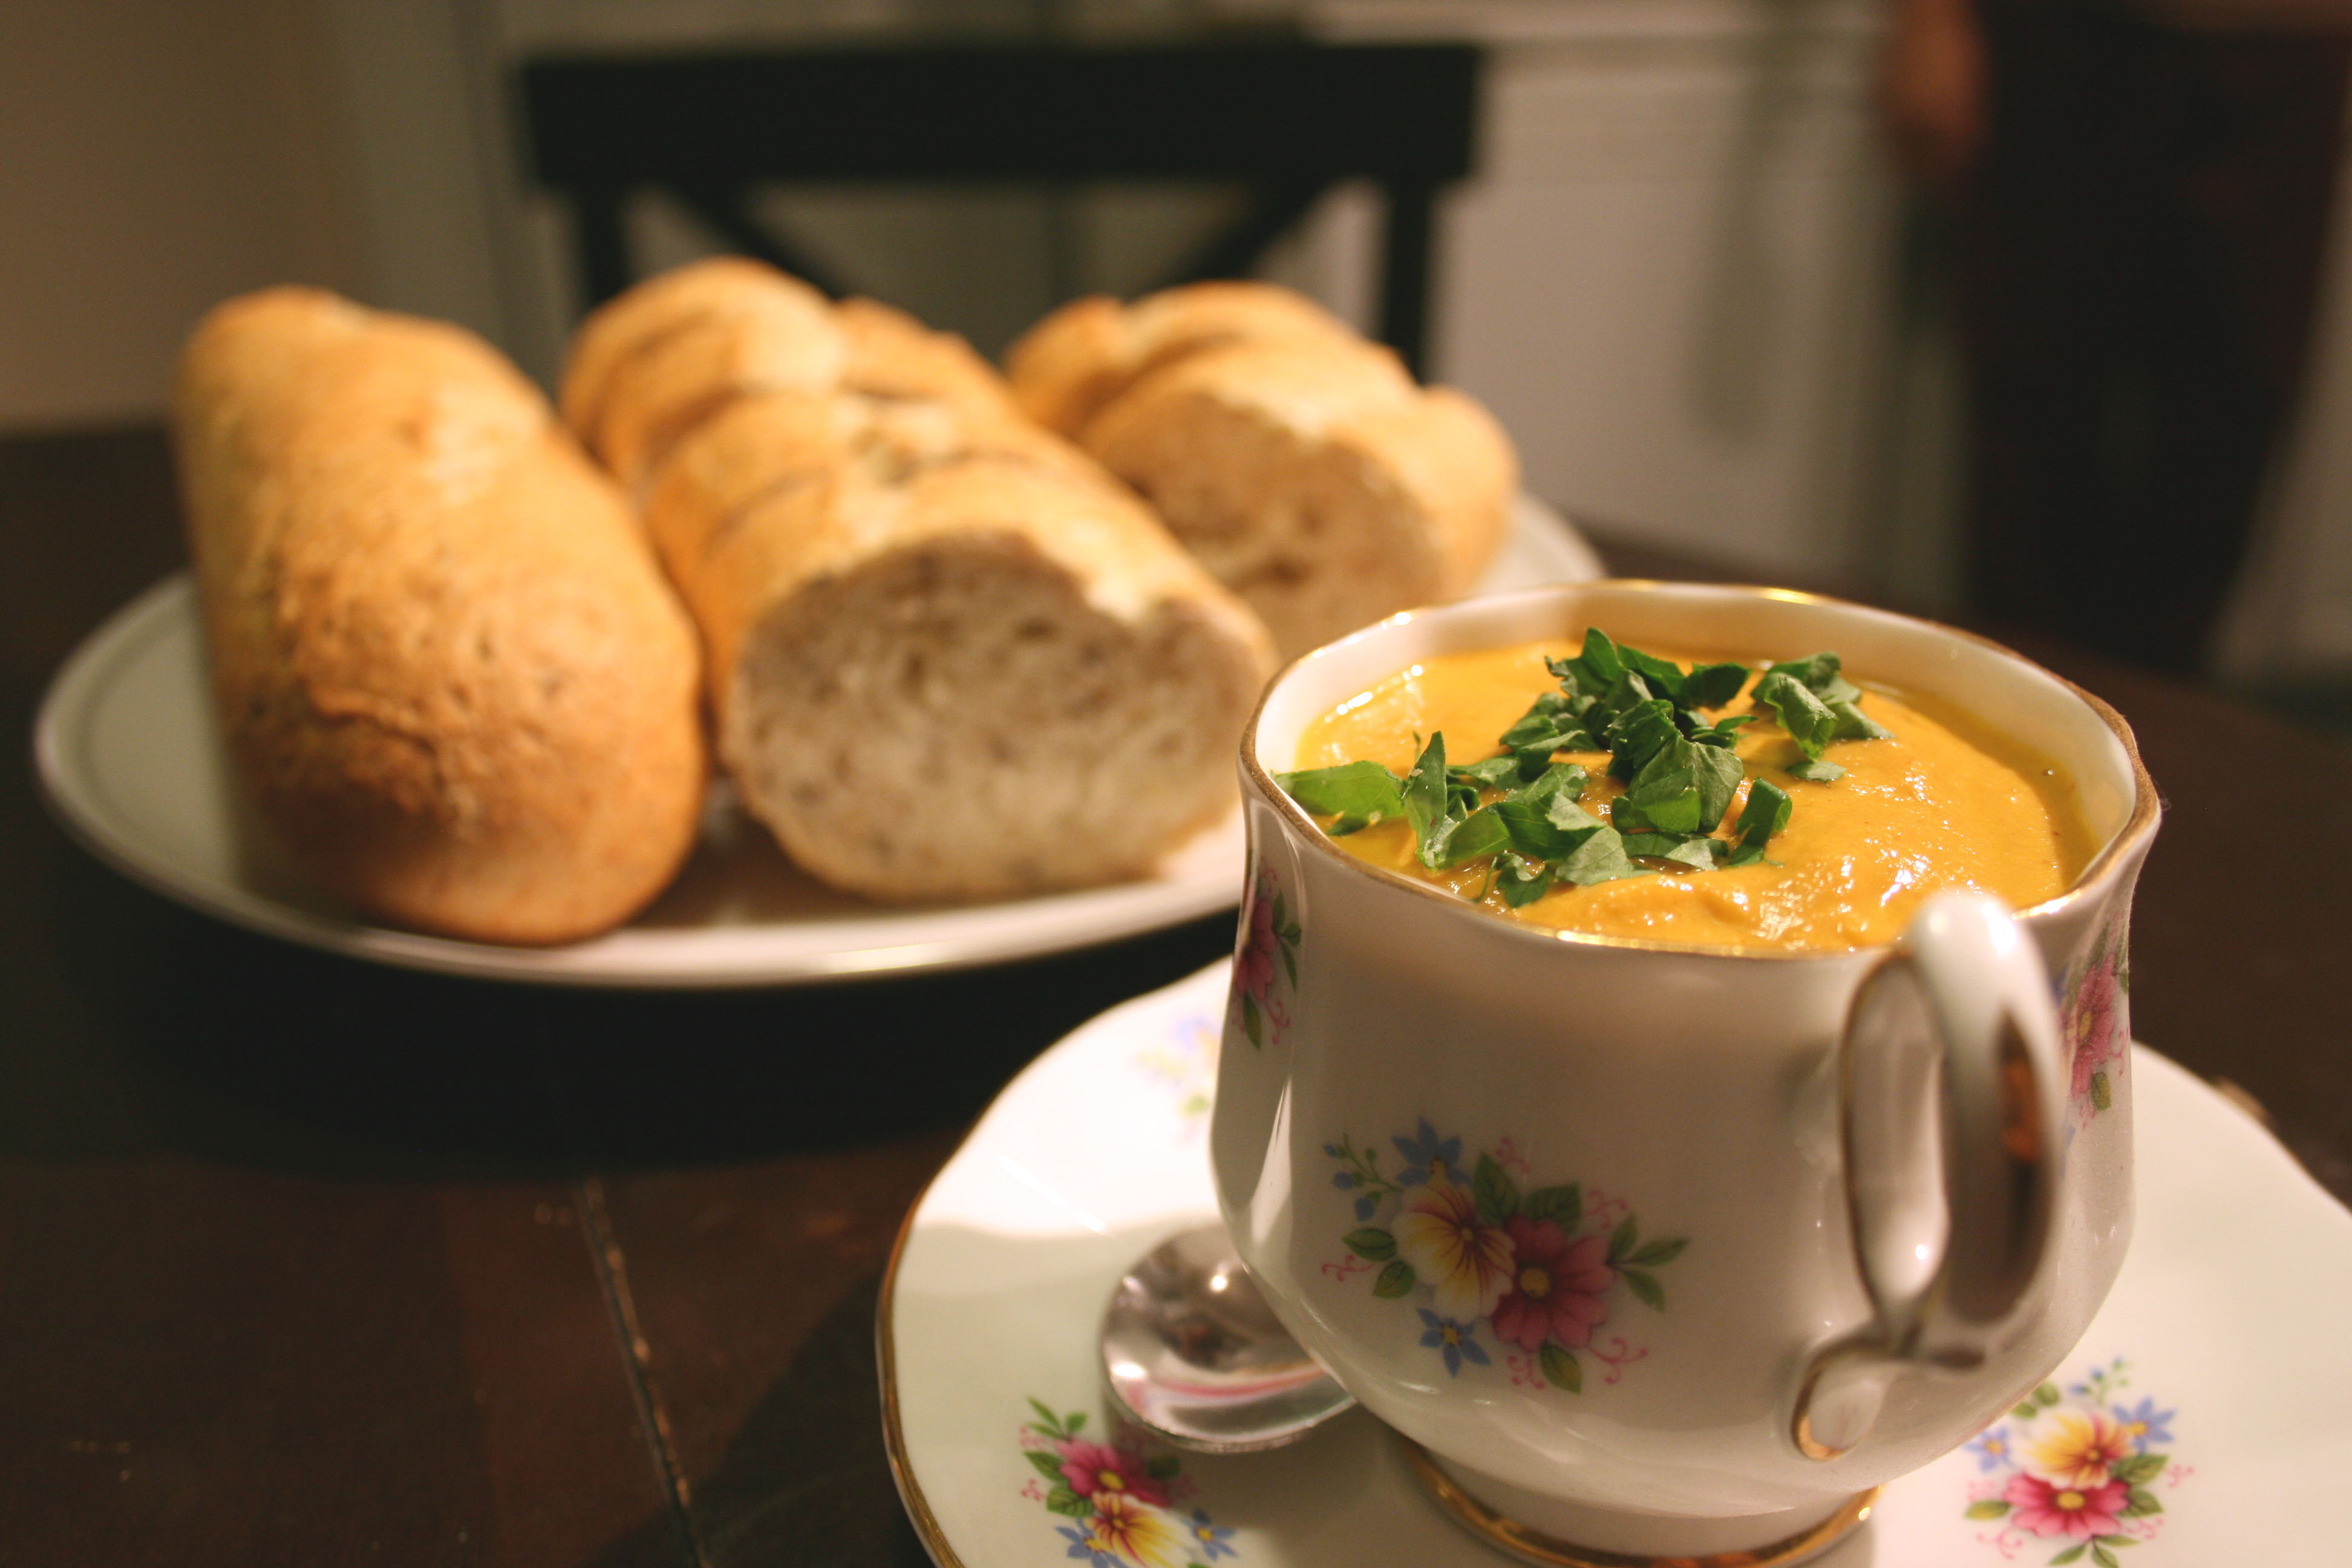
OMG…. Heaven in a bowl!!! I seriously couldn’t get enough of this stuff. When are we going mushroom hunting again??? Unfortunately lobster mushroom season is slowly coming to an end in the Pacific Northwest.

lobster-mushroom-bisque-crusty-bread

This was my first season going mushroom picking and we had such a great time wandering in the woods! None of us got lost and we had a great haul (although we didn’t really get any of the really large chanterelles). We collected tons of yellow and white chanterelles, lobster mushrooms, and chicken of the woods. We pretty much ate mushrooms everyday of the week and we still have chanterelles in the freezer. The lobster mushrooms were definitely my favorite, but we had fun with the chanterelles and chicken of the woods too.

We made this lobster mushroom bisque from One Tomato Two Tomato with only a few changes… mostly just to accommodate what we already had in our kitchen. The bisque turned out fantastic! You would never know that their weren’t any real lobsters in it. Steve and I both went back for seconds! And the leftovers were quickly gone!

Ingredients

Serves 4.

3 lbs lobster mushrooms, cleaned & thinly sliced
7 T. unsalted butter
1T. extra virgin olive oil
5 large shallots, chopped
2 large carrots, chopped
2 ribs celery, chopped
2 garlic cloves, minced
1 medium-large yellow onion, chopped
2 T tomato paste
1⁄4 cup vodka
10 sprigs italian parsley, plus 1 T. Chopped (set aside)
6 sprigs fresh thyme
2 large fresh bay leaves (3 if using dry)
2 cups Chardonnay
6 cups vegetable broth or chicken broth (we used 4 cups veg and 2 cups chicken)
1 t. tabasco sauce
1 c. heavy cream
Kosher salt & pepper, to taste

Instructions

1. In a large soup pot heat the oil and butter on medium high heat. Add the mushrooms and cook until all of the moisture is released and the mushrooms begin to brown. Then add in the shallots, onion, carrots, celery, and garlic and cook for approx. 15 minutes, or until the vegetables are cooked.

2. Stir in the tomato paste until mixed well.

3. Deglaze the pot with the vodka. Use a spatula to scrape up any bits stuck to the bottom.

4. Bind the parsley and thyme together, add the bay leaves, wine and broth.

5. Simmer for up to an hour, allowing the mushrooms and vegetables to become soft.

6. Remove the bay leaves, parsley and thyme and then puree the soup in the blender in batches.

7. Add the puree back to the pot, add the heavy cream. And simmer for a bit longer.

8. Garnish with chopped parsley.

Note: We served ours with a crusty bread from the bakery and it was perfect.

Apple Potato Soup

apple potato soup

An apple a day keeps the doctor away! Homemade apple and potato soup with fresh thyme.

Recipe

Serves 4. 

2 apples, peeled, cored and diced, plus 1/2 an apple sliced into thin wedges
2 celery stalks, chopped in to 1/4 inch slices
1 small-medium onion, diced
1 leek (minus the tough greens), sliced thinly
5 small potatoes, peeled, and diced
2 1/2 cups milk
2 cups chicken broth
1 bay leaf
1/2 teaspoon fresh thyme
1 tablespoon olive oil
salt and pepper
crème fraîche or sour cream

Instructions

1. In a large saute pan combine leek, onion, apple, celery and olive oil over medium-low heat until tender, probably 15 minutes or so.

2. In a large soup pot combine milk and potatoes. Bring to a slow boil, careful to not scorch the milk and cook for about 20 minutes until the potatoes are tender.

3. While the potatoes are cooking add chicken broth, bay leaf and thyme to the apple mixture and simmer for about 20 minutes.

4. Remove the bay leaf and combine all ingredients in the large soup pot and use a Cuisinart Hand Blender to blend all the ingredients until smooth. You could also blend the soup in batches in your blender or food processor. Our Oster Blender does an awesome job with soups, but clean up is so much quicker with the Cuisinart, so inevitably the Cuisinart Hand Blender has been getting way more action lately.

5. You might need to add a little more chicken broth or milk to achieve desired consistency ours was pretty thick. Add salt and pepper to taste.

5. Ladle soup into bowls and garnish with a dollop of crème fraîche or sour cream, a couple of apple slices and a sprinkling of thyme.

We served ours with baked brie, a whole wheat baguette and a dried cranberry, feta and candied pumpkin seed salad.


Pumpkin Goat Cheese Panna Cotta with Caramelized Pears

So we opened a can of organic pumpkin puree to make our pumpkin crème brûlée last week, but we didn’t finish it off, so we made orange-pumpkin spiced macarons, and still hadn’t finished the pumpkin. So to finish it off we created this slightly wacky panna cotta. Panna cotta  means cooked cream in Italian and is historically from the Piedmont region of Italy. It’s a super smooth, creamy eggless custard that is super easy to make and is great with fresh fruit, or in this case pumpkin and caramelized pears.

goat cheese pumpkin panna cotta

okay…so maybe we used more than a dollop of whip cream

Pumpkin Panna Cotta Recipe

3-4 servings.

4 oz. plain goat cheese
1/3 cup milk
1 ½ cups half and half (heavy cream or even milk, you can make this as full fat as you want)
1/2 to 3/4 cup sugar (to taste)
1/2 teaspoon vanilla
1 teaspoon cinnamon
1/4 teaspoon nutmeg
1 packet gelatin (1/4 oz)

Instructions

1. To soften gelatin add it to 1/3 cup milk and stir gently. Let sit while you prepare rest of the panna cotta mixture.

2. In a sauce pan combine goat cheese, pumpkin, half and half, sugar, vanilla, cinnamon and nutmeg and bring to a quick simmer.

3. Remove from heat and add the gelatin mixture. Whisk briskly to make sure everything is blended well. We used the whisk attachment that came with our Cuisinart hand blender’s whisk attachment and the cream turned out super smooth.

4. Divide into 4 lightly greased ramekins and refrigerate for 2 ½ to 3 hours.

Caramelized Pears Recipe

2 pears
2 Tablespoons unsalted butter
2 Tablespoons sugar
1/2 teaspoon cinnamon

Instructions

1. Peel pears, quarter and core them; then dice into small cubes (1/4 in. or smaller).

2. In a small frying pan melt the butter until frothy then add pears, sugar and cinnamon. Over medium heat continue stirring until pears are tender and golden.

3. Remove from heat and set aside till ready to use.

goat cheese pumpkin panna cotta with caramelized pears

Serving Instructions

1. Remove the panna cotta from the ramekin by boiling an inch and a half of water (enough to cover atleast ½ of the ramekin).  Remove the pan from the heat and dip one ramekin at a time in the water for about 45 seconds. Then take a butter knife and run it around the inside edge of the ramekin. Take your ramekin and place it upside down on a pretty plate, tap each side of the ramekin a few times to loosen the panna cotta from the ramekin. This takes practice, but the presentation is way prettier than serving it in a ramekin….unless of course you have beautiful ramekins.

2. Once you’ve successfully removed the panna cotta, dress it up with a spoonful or two of caramelized pears and a dollop of homemade whip cream.

3. Serve with a whiskey or rum spiked hot apple cider or strong french pressed coffeecoffee for an ultimate fall treat.


Easy Pumpkin Crème Brûlée

pumpkin creme brulee

Easiest pumpkin crème brûlée….ever!!!

Recipe (3 servings)

1 cup heavy cream
1/2 cup pumpkin puree
1/4 cup brown sugar, packed
1/4 cup granulated sugar
2 egg yolks
1/8 teaspoon cinnamon
1/8 teaspoon allspice
1/8 teaspoon nutmeg
1 teaspoon vanilla

Instructions

1. Preheat oven to 325 F.

2. Whisk together yolks and brown sugar.

3. Stir heavy cream, vanilla and spices into yolk and brown sugar mixture.

4. Pour crème brûlée mixture into your ramekins. We had enough to fill 3.

5. Place ramekins into a baking dish and fill baking dish with hot water about ½ way up the side of the ramekins to create a water bath.

6. Carefully place the baking dish into your oven and bake for 30-35 minutes.

7. Chill cooked crème brûlée for 2 ½ hours in the refrigerator.

8. Coat tops of crème brûlée with the granulated sugar and caramelize with a Culinary Torch.


Playing with Knives

Yep, it’s raining again….not exactly surprising. Steve and I conjured up a fantastic idea to keep us occupied… taste all the pumpkin beers we can get our hands on while slicing and dicing our own pumpkins. Here are the results:

Pumpkin Beer

All things pumpkin: drinking pumpkin and carving pumpkin


Southern Tier Pumking Imperial Pumpkin Ale (Lakewood, New York)

Southern Tier Pumking Imperial Pumpkin Ale

Southern Tier Pumking Imperial Pumpkin Ale

YUM!!! The Pumking is by far my favorite of the pumpkin ales. It’s like drinking an alcohol spiked pumpkin pie. This malty, copper colored brew’s prominent flavors include brown sugar, vanilla, whipped cream, and pumpkin pie spices.

ABV: 8.6%

IBU: 25ish?

Elysian The Great Pumpkin Imperial Pumpkin Ale (Seattle, WA)

Elysian the great pumpkin imperial pumpkin ale

Elysian The Great Pumpkin Imperial Pumpkin Ale

This was another good one. Great Pumpkin definitely has pumpkin, cinnamon, sugar, allspice, and nutmeg on the nose, which is balanced by a certain breadiness that reminds me of pie crust. The pumpkin pie spices are a little more subtle than the Pumking. The hops do provide a slightly drier finish to this beer.

ABV: 8.1%

IBU: 22

Elysian Night Owl (Seattle, WA)

Elysian The Great Pumpkin and Elysian Night Owl

Elysian The Great Pumpkin and Elysian Night Owl Pumpkin Ale

Dessert in a glass. I could probably drink two of these, but then I’d have to call it quits. Night Owl is sweeter and spicier than the Great Pumpkin and has stronger notes of ginger, cinnamon and clove.

ABV: 5.9%

IBU: 18


Uinta Brewing Oak Jacked Imperial Pumpkin Ale

Oak Jacked Imperial Pumpkin Ale

Uinta Brewing Oak Jacked Imperial Pumpkin Ale

On first taste I said “WOW, this is BOOZY!” and every sip after you can still taste the booze. At 10.31% ABV this beer packs an alcoholic punch. The booziness overpowers this beer’s subtle flavors of pumpkin, vanilla and spice. I would compare this beer to pumpkin bread instead of pumpkin pie, as it is not cloyingly sweet like some of the others.

ABV: 10.31%

IBU: 39


Uinta Brewing Punk’n (Salt Lake City, Utah)

Uinta Punk'n

Uinta Brewing Punk’n Pumpkin Ale

This was probably my least favorite of the pumpkin ales. It smelled and tasted like fresh cut pumpkin and had a raw, earthy, vegetable flavor to it. While the beer did have hints of honey (yum) I would have liked more spiciness in the form of cinnamon, clove, allspice, ginger etc.; Punk’n might pair nicely with foods that have that flavor profile.

ABV: 4%

IBU: 10

Feeling saucy Steve and I managed to get two pumpkins carved without losing any fingers…yay!!!

Spicy Fennel and Kabocha Soup with Spiced Candied Pumpkin Seeds

Spicy Fennel and Kabocha Soup

Spicy Fennel and Kabocha Soup with Spiced Candied Pumpkin Seeds

With the first rain of the season upon us, and my cold in full swing, Steve and I decided to stay in and make a gigantic pot of soup.  And we had nearly everything for this spicy fennel and kabocha soup from Suzanne Goin in our kitchen, and what we didn’t have we were able to improvise. I’m posting her original recipe with notes in “( )” of the changes we made.

Recipe makes 6 generous servings.

Soup

2 pounds Kabocha squash (we used one whole kabocha)

2 medium bulbs of fennel

4 Tablespoons of EVOO

2 teaspoons fennel seeds

4 Tablespoons unsalted butter (we only had 2 T. so we used 2 T. EVOO as well)

2 cups sliced onion (we chopped  ½ medium red onion and one full medium white onion)

1 Tablespoon Thyme leaves (gathered from our garden and supplemented by our spice cabinet)

2 chiles de arbol (we substituted 1 minced cowhorn pepper from our garden)

1 bay leaf

3/4 cup sherry

10 cups chicken stock (we used 2 32 oz. boxes of organic chicken broth instead)

1/4 cup crème fraîche (since the crème fraîche isn’t getting mixed into the soup we substituted sour cream)

candied pumpkin seeds

Sea salt and fresh ground black pepper

Pumpkin Seeds

1/4 teaspoon cumin seeds (we used ground cumin seeds and just toasted them for a couple minutes in the toaster oven)

2 teaspoons unsalted butter

1/2 cup raw pumpkin seeds

1 tablespoon granulated sugar

1 teaspoon honey

Pinches of cinnamon, paprika, and cayenne

Fresh ground sea salt

Instructions

1. Preheat oven to 400 Fahrenheit

2. Candy your pumpkin seeds. First toast the ground cumin seed in the toaster oven for a couple minutes. Melt the butter in a small pan, add the cumin, add the pumpkin seeds, sugar, spices and sea salt, stirring constantly until they are golden brown. Let cool for a minute and stir in the honey. Arrange on a piece of parchment until ready to use.

3. Prep your squash by halving, seeding and peeling it (place squash cut side down and use a sharp knife). Cut your squash into 1 inch thick slices.

4. Prep your fennel by rinsing it well, removing tough stalks and base, halving lengthwise and cutting into ½ inch thick slices.

5. Arrange fennel and squash on large baking sheet, drizzle with the olive oil and sprinkle with fresh ground sea salt and pepper. Roast uncovered in oven for 35 minutes until tender and slightly golden.

6. Toast fennel seeds in a small pan over medium heat for a couple minutes, until slightly browned and they aroma becomes more pungent. The original calls for grinding your seeds in a mortar and pestle, we just threw them in a coffee grinder that we only use for spices and nuts….worked like a charm!

7. Heat your large soup pot on high heat for two minutes and add the butter. Once it begins to foam add your chopped onion, minced pepper (or chiles if you used them), fennel seeds, thyme, bay leaf and fresh ground pepper (we used our Simply Calphalon Nonstick 5-Quart Pot and worked beautifully).The original recipe called for chicken stock (which is unsalted), but since we used chicken broth (salted) we omitted the 1 teaspoon salt you would normally add at this point. Reduce heat to medium-high, and stir continually until onions are tender and translucent…about 10 minutes.

8. Add your fennel and squash to the mix. Turn the heat up high and add the sherry. Continue to stir and allow the sherry to reduce for a couple minutes. At this point you can add your chicken broth or stock, turn the heat down to medium-low and simmer for another 20 minutes or so.

9. According to Suzanne’s recipe you should separate the solids from the liquids, retaining both, and blend the soup in three batches, so a third of the solids with a 1/2 cup of the liquids. Make sure to remove the bay leaf. We did this her way, but next time we will just pour (or ladle) it into the food processor in batches, no need to separate. We ended up with the perfect amount of liquids to solids, so no leftover liquids like when you do it her way.

10. Combine the batches of soup and make any flavor adjustments. Pour into bowls and garnish with crème fraiche or sour cream and the candied pumpkin seeds.

I think this soup would also be awesome garnished with some crispy pancetta.

You could also easily make this a vegetarian, gluten free, dairy free soup by substituting EVOO for the butter, vegetable broth for the chicken stock and omitting the crème fraîche/sour cream. You could even make it vegan by substituting brown sugar for the honey on the pumpkin seeds.

We ate ours with toasted, sliced baguette spread with goat cheese.

Rain, Rain, Go Away

Rain, Rain, Go Away

What’s a girl to do when she gets called off of work because of rain??? Drink as many pumpkin ales as possible, make some squash soup and carve a couple Jack-o-lanterns, of course! Summer has finally come to an end and I better embrace fall or it’s going to be a really crummy season!!! Now is the time to start checking things off of my “To Do” list and to start planning our six month honeymoon.

Let’s celebrate the first rain of the season!!!

Spicy Kabocha Soup

Pumpkin Ales

Fancy Cheese

Tomato Fennel Tart

Tomato Fennel Tart

Tomato Fennel Tart

Tomatoes are taking over our lives!!! Our garden is spilling over, they’re arriving in our Organics to You shipments, and the farmers are selling the most amazing heirlooms right now. We’re eating tomatoes for breakfast, lunch and dinner and we’re getting creative with these juicy little suckers. This tomato fennel tart, inspired by a recipe from Sunset Magazine (Nov 2005) put a smallish dent in our ever growing tomato supply and allowed us to put the fennel from Organics to You to use too. As an added benefit this tart is perfect topped with a sunny-side up egg for breakfast.

Recipe

1 disk Cheese Pastry Dough (or if you’re lazy, one pre-made pie crust sprinkled with ½ cup shredded gruyere cheese)

1 head of fennel rinsed and sliced crosswise in to ¼ inch slices (discard the base and the green stalks)

7 shallots, peeled and sliced in to ¼ inch slices

½ cup chopped Italian parsley (or curly if you prefer the taste), plus one tablespoon for garnish

1 cup shredded parmesan

20 cherry tomatoes, rinsed and halved

Instructions

1. If you made your Cheese Pastry Dough roll it out so it’s atleast 12 inches diameter and transfer to your tart pan. If you’re using a pre-made pie crust simply unroll and transfer to your tart pan. Trim off any overhanging dough, poke holes in bottom of crust, cover with plastic wrap and put crust in the freezer for 30 minutes while you cook the fennel and shallots.

2. Preheat oven to 350 degrees Fahrenheit.

3. Heat medium sized frying pan on medium-low heat and add olive oil, fennel, and shallots. Stir frequently till fennel and shallots are a caramel colored brown, approximately 30 minutes.

4. Sprinkle veggie mix with 1/2 cup parsley, add salt and pepper to taste and remove from heat.

5. Pull your crust out of the freezer and bake in oven for 20 minutes. If you are using a pre-made crust sprinkle the crust with the gruyere before baking for 20 minutes.

6. Once crust is golden brown remove from the oven, layer the parmesan cheese on the bottom of the crust, then the fennel/shallot mix, and finally add the sliced cherry tomatoes.

7. Bake in the oven till cheese is golden brown, approx. 10 to 15 minutes.

8. Garnish by sprinkling with remaining Italian parsley.

Steve and I had leftovers, so for breakfast we added a sunny-side up egg to the top of the reheated tart and it was delicious!!!

Tomato Fennel Tart with Sunny-Side Up Egg

Breakfast: Tomato Fennel Tart with sunny-side up egg

This tart is excellent served with a simple arugula salad tossed in a homemade lemon vinaigrette.

Goat Lake Loop

Mt. Adams from the Goat Lake trail

View of Mt. Adams from the Goat Lake trail

During September’s cold snap Steve and I decided it would be a good idea to hit the trails for a quick overnighter in the Goat Rocks Wilderness. Braving sleet and below freezing temperatures we hiked up to Snowgrass Flat, then over to Goat Lake and down Jordan Basin to complete a loop hike starting at the Snowgrass Trailhead.

Quick Stats

Distance: 13 miles (with tons of options for side trips, ours ended up being around 16 miles)

Time: 2 days or more

Difficulty: Moderate (only because of the exposure and 3000 ft. elevation gain)

Season: End of July to October

Dog Friendly: Yes, as long as they know to stay on the trail and are confident walking on narrow trails with steep drop offs

Pros: Stunning views of Mt. Adams, wildflowers, mountain goats, plenty of water

Cons: busy trail, horse use in places, weather can change quickly

Day 1

On the first day we hiked up to Snowgrass flat on trail #96, a pretty straightforward easy 4 mile hike. After continuing about a mile past the flat to find a site closer to day two’s destination, and finding the best sites already taken, we ended up backtracking to the flat and camping near a pretty little creek. Shortly after we set up camp a small storm blew in and brought with it sleet, hail and very cold temps. We were so happy we packed warmly and brought our waterproof gear.

Wildflowers at Snowgrass Flat

There were still tons of wildflowers in Snowgrass Flat

If we hadn’t been worried about the weather we could have done one of the great side trips on the PCT over to Cispus Basin or up to the summit of Old Snowy, both have been highly recommended by fellow hikers.

Wildflower filled meadow on Lily Basin trail between Snowgrass Flat and Goat Lake

Atleast our detour to find a suitable camp led us to this wildflower filled meadow on the Lily Basin trail between Snowgrass Flat and Goat Lake.

Day 2

As I was laying in the tent debating whether to leave my positively toasty Marmot sleeping bag or not, I looked up and thought “Wow, there’s no condensation we must have vented the tent really well.” NOT, all that condensation was FROZEN. The whole meadow had a frozen layer of frost/ice over it, but happily we woke up to a stunning view of Mt. Adams peeking through the trees on the other side of the flats. We were glad to see the skies had cleared and we would finally have some views. A hiker we passed on the trail said his thermometer read 22 degrees Fahrenheit….brr, no wonder everything was frozen.

Mt. Adams from Snowgrass Flat

Good morning and goodbye clouds. Our morning view of Mt. Adams.

Lily Basin Trail Sign

Continue on the Lily Basin trail to get to Goat Lake.

Wildflowers Goat Rocks Wilderness

Bring on the wildflowers; they’re never ending on the beautiful trail.

The hike over to Goat Lakes on the Lily Basin trail (#86) is pretty moderate, just a slow and steady uphill with spectacular views of the valley, wildflowers, and Mt. Adams. After about 3 miles you’ll reach Goat Lake, which was still partially frozen in September. If you’re lucky you might see some mountain goats up on the slope behind the lake; we saw at least 20 mountain goats above the lake.

Wildflowers with Mt. Adams in background

Didn’t I promise you views and wildflowers!!!

View of the valley from the Lily Basin trail before Goat Lake

View of the valley and Mt. Adams from the Lily Basin trail before you reach Goat Lake.


Goat Lake, Goat Rocks Wilderness

Goat Lake still partially frozen….maybe if you have really amazing eyes you can see the mountain goats on the slope behind the lake.

Hiking down from the lake the trail is fairly narrow and was even muddy in a couple places, so watch your step. If you turn around and look back the way you came you have a great view of Old Snowy.

Old Snowy, Goat Rocks WIlderness

Here’s your view of Old Snowy.

Less than a mile past the lake is a junction which takes you up to the top of Hawkeye Point and over to Lily Basin. To complete the loop continue straight and head down into gorgeous Jordan Basin,which looks like it just drops off at the base. There is a really pretty campsite near the bottom, although fairly exposed.

Jordan Basin, Goat Rocks Wilderness

The trail through steep Jordan Basin. The trail in this picture is characteristic of the trails on this loop hike.

Continue on trail 95 or to check out the Goat Ridge lookout detour to 95A which rejoins 95 as it heads back down to the start of your hike. To complete the loop either walk on the road back to your car or take the trail marked Snowgrass Flats that goes through Berry Patch and over to where your car is parked at the Snowgrass trailhead.

As you pack for this trip don’t forget the Ten Essentials and to pack your layers.

Planning Resources:

100 Classic Hikes in Washington
by Ira Spring and Harvey Manning

One Night Wilderness: Portland: Quick and Convenient Backcountry Getaways within Three Hours of the City
by Douglas Lorain

Washington Trail Association